
Published by MotoGearsPro | Updated: 2026 | Reading Time: ~12 minutes
Riddle time: 𝑾𝒉𝒂𝒕 𝒅𝒐 𝒂 𝒅𝒆𝒂𝒅 𝒎𝒐𝒕𝒐𝒓𝒄𝒚𝒄𝒍𝒆 𝒃𝒂𝒕𝒕𝒆𝒓𝒚 𝒂𝒏𝒅 𝒂 𝒃𝒂𝒅 𝒓𝒆𝒍𝒂𝒕𝒊𝒐𝒏𝒔𝒉𝒊𝒑 𝒉𝒂𝒗𝒆 𝒊𝒏 𝒄𝒐𝒎𝒎𝒐𝒏?
𝑩𝒐𝒕𝒉 𝒍𝒆𝒂𝒗𝒆 𝒚𝒐𝒖 𝒔𝒕𝒓𝒂𝒏𝒅𝒆𝒅, 𝒃𝒐𝒕𝒉 𝒅𝒓𝒂𝒊𝒏 𝒚𝒐𝒖𝒓 𝒘𝒂𝒍𝒍𝒆𝒕, 𝒂𝒏𝒅 𝒃𝒐𝒕𝒉 𝒔𝒐𝒎𝒆𝒉𝒐𝒘 𝒇𝒂𝒊𝒍 𝒕𝒉𝒆 𝒎𝒐𝒎𝒆𝒏𝒕 𝒕𝒉𝒆 𝒘𝒆𝒂𝒕𝒉𝒆𝒓 𝒊𝒔 𝒇𝒊𝒏𝒂𝒍𝒍𝒚 𝒑𝒆𝒓𝒇𝒆𝒄𝒕.
You know the feeling. The sun is out. The roads are dry. You’ve been waiting for this exact day all week. You throw a leg over the saddle, hit the starter button, and… click. Click. Click. Nothing. Just that sad, hollow ticking sound of a battery that has officially given up on life—and on you.
If you’ve been there (and if you ride long enough, you will be there), then this guide is your lifeline. Motorcycle battery replacement doesn’t have to be a mystery you throw money at the dealership to solve. With the right information and about 30 minutes of your time, you can do this yourself—even if the most mechanical thing you’ve ever done is assemble flat-pack furniture.
Let’s get into it.

Table of Contents
- Signs Your Motorcycle Battery Needs Replacing
- The Triangle of Power: Battery, Starter & Alternator Explained
- What You’ll Need Before You Start
- Step-by-Step Motorcycle Battery Installation Guide
- Preparation
- Removal
- Cleaning
- Installation
- Battery Types Deep-Dive: AGM vs. Lithium-Ion vs. Lead-Acid
- Cold Cranking Amps (CCA): Why It Actually Matters
- Common Beginner Mistakes (Painful, But Educational)
- Keeping Your Battery Alive: Tenders & Trickle Chargers
- FAQ: 8 Questions Every New Rider Asks
Signs Your Motorcycle Battery Needs Replacing
Before you spend a dime, make sure you’re actually dealing with a dead battery and not something else (like a blown fuse or a corroded connection). Here are the telltale signs your motorcycle battery needs replacing:
- Slow or labored cranking — The starter motor sounds like it’s running through peanut butter. It tries, bless it, but it just can’t commit.
- The dreaded “click of death” — One loud click, then silence. The solenoid is engaging, but there’s not enough juice to spin the starter.
- Complete silence when you hit the button — No click, no crank, no dashboard lights. Fully dead.
- Battery warning light — Some modern bikes will throw a warning light if the charging system isn’t keeping up.
- Dim headlights at idle — If your lights brighten noticeably when you rev the engine, your battery is struggling to hold voltage.
- The battery is 3–5+ years old — Age alone is enough reason. Batteries don’t age gracefully.
- Sulfation or visible damage — White, chalky buildup on the terminals, or a cracked/bulging case. That battery is done.
Quick voltage test: Grab a multimeter. A healthy, fully-charged motorcycle battery should read around 12.6–12.8 volts at rest. Below 12.0 volts? It’s struggling. Below 11.5 volts? Time to shop.
The Triangle of Power: Battery, Starter & Alternator Explained
Here’s something that trips up a lot of new riders: a battery problem doesn’t always mean the battery’s fault.
Think of your motorcycle’s electrical system as a triangle with three equal sides:
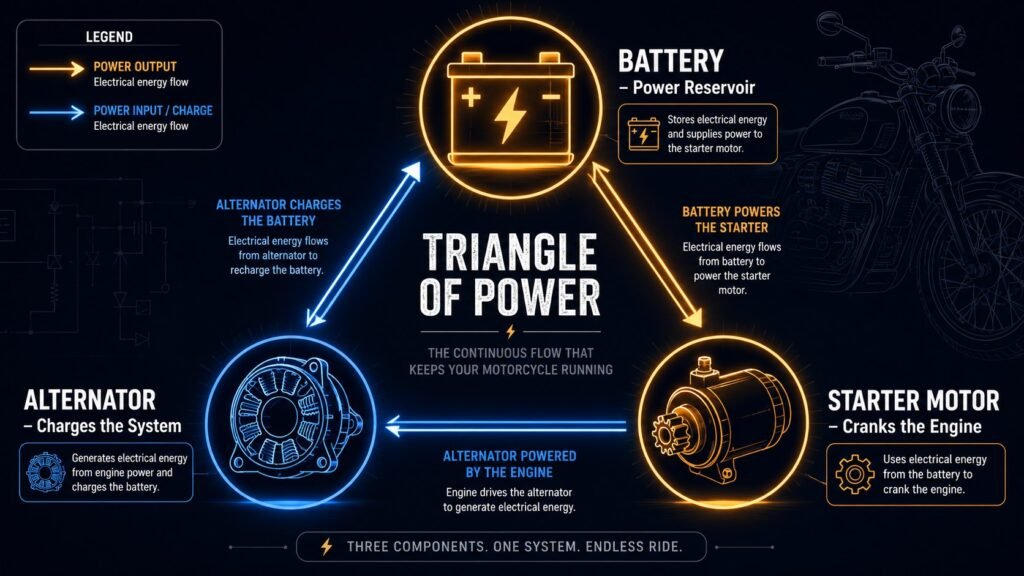
🔋 The Battery is your power reservoir. It stores electrical energy and delivers it on demand—for starting, running lights, and powering electronics when the engine is off or just idling.
⚙️ The Starter Motor draws a huge burst of current from the battery to physically crank the engine. It only runs for a second or two, but it’s extremely demanding. A weak battery simply can’t deliver enough amps, hence the clicking.
🔌 The Alternator (Stator + Regulator/Rectifier) is your bike’s built-in generator. Once the engine is running, it charges the battery and powers the electrical system. If your alternator is failing, it’ll drain a brand-new battery within weeks.
The takeaway: If you install a new battery and it dies quickly again, don’t just buy another battery—test the charging system. A healthy alternator should charge the battery at 13.5–14.5 volts at around 3,000 RPM. Anything lower and you’ve got a deeper problem.
What You’ll Need Before You Start
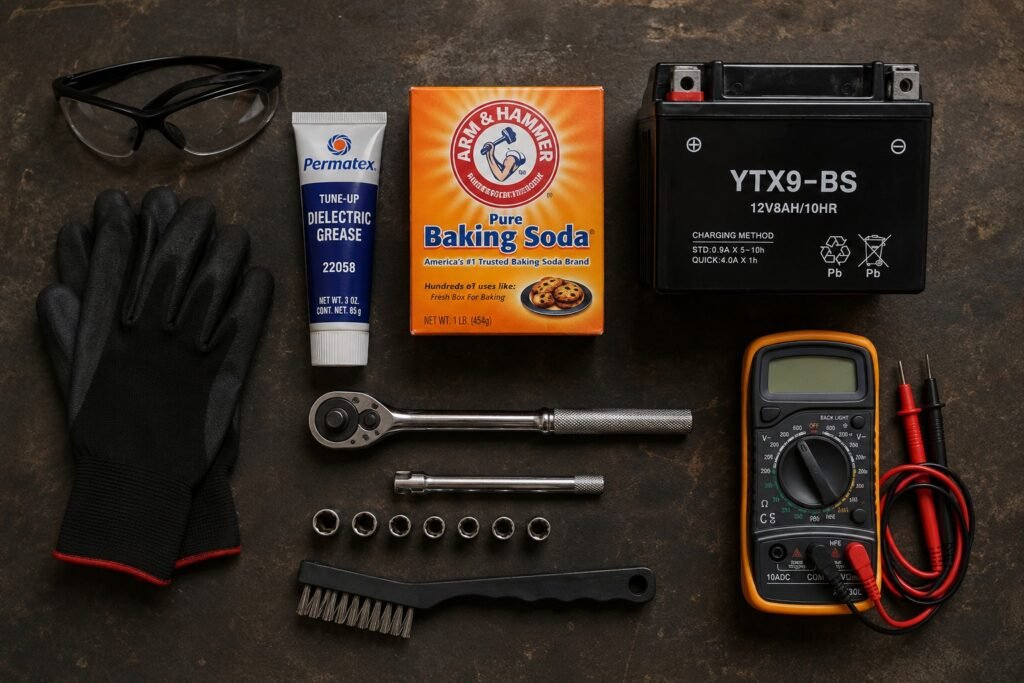
Good news: you don’t need a mechanic’s garage worth of tools. Here’s the full list:
Essential Tools & Supplies
| Item | Why You Need It |
|---|---|
| Socket set or screwdrivers | To access the battery compartment |
| 8mm or 10mm wrench/socket | For terminal bolts (varies by bike) |
| Multimeter | To test old battery and verify new one |
| Baking soda + water + old toothbrush | For cleaning terminals |
| Wire brush or terminal cleaning tool | For corrosion removal |
| Dielectric grease | Prevents future corrosion on terminals |
| Safety glasses & gloves | Batteries contain acid and emit hydrogen gas |
| Replacement battery | Obviously — matched to your bike’s specs |
| Battery terminal memory saver (optional) | Preserves ECU settings during swap |
Pro tip from MotoGearsPro: Check your owner’s manual before ordering a battery. The spec page will list the exact battery group size, voltage (always 12V for modern bikes), and minimum CCA rating. Don’t guess.
Step-by-Step Motorcycle Battery Installation Guide
This is the heart of this guide. Follow these steps carefully, and your motorcycle battery replacement will go smoothly. We’re breaking it into four phases: Preparation, Removal, Cleaning, and Installation.
Phase 1: Preparation
Step 1: Park safely and let the bike cool. Turn the bike off and let it sit for at least 15 minutes. If the engine was running, components near the battery box can be warm. Work in a well-ventilated area—batteries emit hydrogen gas, which is flammable. No smoking, no open flames nearby. Seriously.
Step 2: Gather everything before you start. You don’t want to be hunting for a wrench with a terminal dangling loose. Lay out every tool you need on a clean rag.
Step 3: Locate the battery. On most bikes, the battery lives under the seat. Lift the seat (usually a key-lock or a couple of bolts), and there it is—typically a black rectangular box with two cables attached. On some sportbikes, the battery is under a side panel or even under the fuel tank. Check your manual if you can’t find it.
Step 4: Note the cable routing. Before you touch anything, take a photo with your phone. Future-you will be grateful. Note which cable goes where and how it routes through the frame. This is especially important on bikes where the cables are tucked away or zip-tied.
Phase 2: Removal — How to Disconnect a Motorcycle Battery Safely
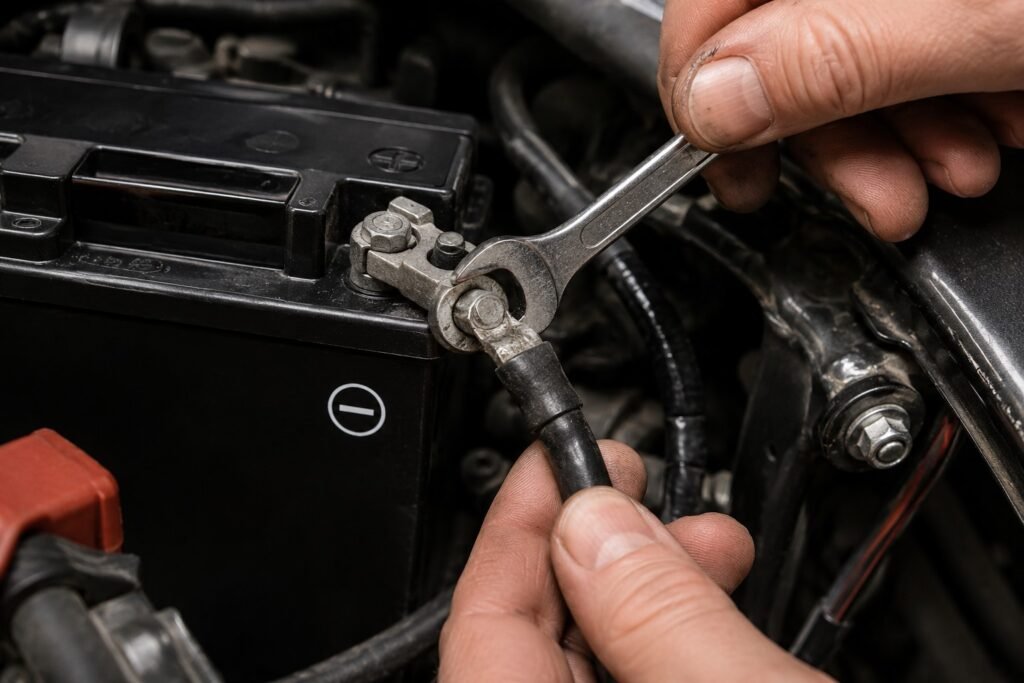
This is where people mess up. The sequence matters. Here’s how to disconnect a motorcycle battery safely:
Step 5: Remove the NEGATIVE (black) cable first.
“Motorcycle battery terminal sequence: red or black first?” — Always black (negative) first when disconnecting. Always red (positive) first when connecting. This is the universal rule, and breaking it can cause a short circuit that fries your electronics or—worst case—causes a spark near the battery.
Use your 8mm or 10mm wrench to loosen the nut on the negative terminal. Wiggle the cable off the post and tuck it away so it can’t accidentally touch the battery post again.
Step 6: Remove the POSITIVE (red) cable. Same process. Loosen, wiggle, remove. Fold it out of the way.
Step 7: Remove the battery hold-down bracket. Most batteries are secured with a small metal or rubber bracket, strap, or foam block. Remove whatever is holding the battery in place and set those fasteners somewhere safe. An egg carton is a fantastic small-parts tray, by the way.
Step 8: Lift the battery out. Motorcycle batteries are heavier than they look, especially lead-acid types. Lift it straight up and out of the battery box. If it’s been in there for years, it may be slightly stuck from corrosion or a tight fit—rock it gently rather than yanking.
⚠️ If the battery casing is cracked, bulging, or leaking acid: Handle it with gloves and dispose of it properly. Don’t put it in regular trash. Auto parts stores (AutoZone, O’Reilly, etc.) will take old batteries for recycling—this is usually free.
Phase 3: Cleaning
Don’t skip this phase. Installing a fresh battery on corroded terminals is like putting clean clothes on a dirty body.
Step 9: Inspect the battery terminals and cables. Look for the white or blue-green crusty buildup—that’s corrosion (lead sulfate and other compounds). Also inspect the cable ends themselves. If the copper wire inside is green, heavily corroded, or the insulation is cracked, you may need new cables too.
Step 10: Clean the battery terminals. Mix one tablespoon of baking soda with one cup of warm water. Dip an old toothbrush in the solution and scrub the terminal connectors (the clamps on your bike’s cables) until the corrosion dissolves. The baking soda neutralizes the battery acid that causes corrosion. Rinse with a little clean water and dry thoroughly.
Step 11: Clean the battery tray. Wipe down the battery box with a damp cloth. If there’s any acid residue, the baking soda solution works here too.
Step 12: Apply dielectric grease. Once everything is clean and dry, apply a thin coat of dielectric grease to the cable clamps. This creates a moisture barrier that dramatically slows future corrosion. It’s a 30-second step that can add years to your terminal life.
Phase 4: Installation
Step 13: Place the new battery in the tray. Orient it correctly—positive terminal on the correct side (match it to where the red cable reaches). Most batteries have a + and – molded right into the case.
Step 14: Reattach the hold-down bracket. Secure the battery firmly. A battery that bounces around is a battery that fails prematurely. It can also short against the frame, which is a very bad day.
Step 15: Connect the POSITIVE (red) cable first. Slide the clamp over the positive post, tighten the nut firmly. Not gorilla-tight—just snug. You want solid contact without stripping the soft lead post.
Step 16: Connect the NEGATIVE (black) cable. Same process. Positive first, negative second. Every time.
Step 17: Double-check everything. Wiggle both cables. They should feel solid. No movement at the terminal posts. Take one more look at your earlier photo to make sure routing looks right.
Step 18: Test before you button everything up. Turn the key to ON. Do the dash lights come on? Do your indicators work? Hit the starter. If the engine cranks and fires—congratulations, you just completed your first motorcycle battery replacement. Seriously, take a moment. That’s a win.
Step 19: Reinstall the seat and go ride. You’ve earned it.
Battery Types Deep-Dive: AGM vs. Lithium-Ion vs. Lead-Acid
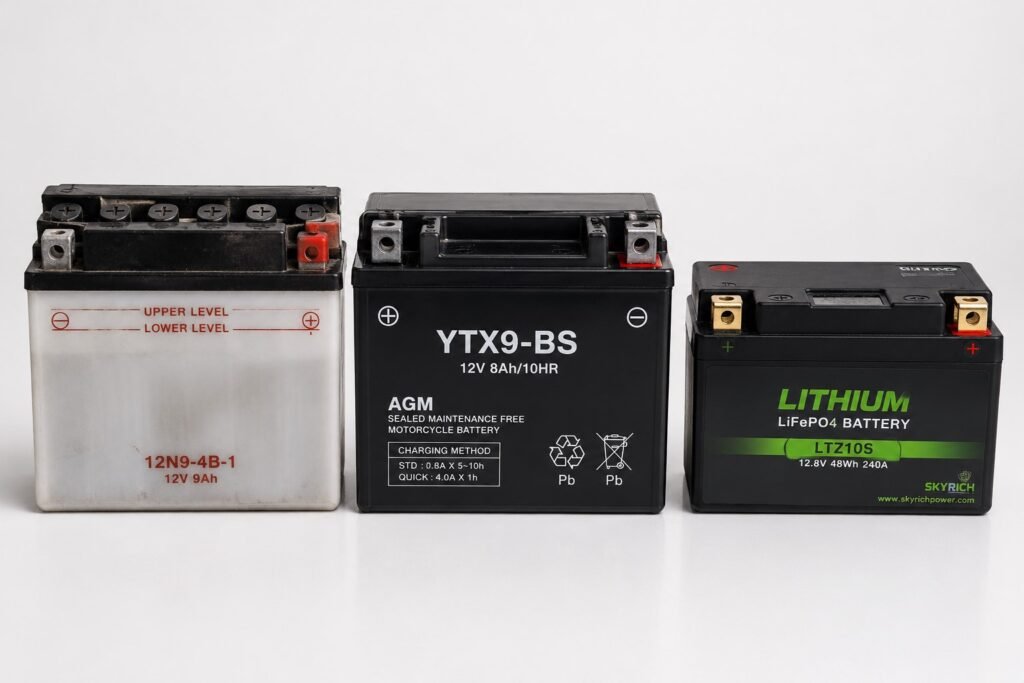
Not all motorcycle batteries are created equal. Here’s what you need to know:
Comparison Table
| Feature | Flooded Lead-Acid | AGM (Absorbed Glass Mat) | Lithium-Ion (LiFePO4) |
|---|---|---|---|
| Cost | Cheapest ($20–$50) | Mid-range ($50–$120) | Most expensive ($100–$300) |
| Weight | Heaviest | Medium | Lightest (60–80% lighter) |
| Maintenance | Needs electrolyte top-offs | Sealed, maintenance-free | Sealed, maintenance-free |
| Lifespan | 2–4 years | 3–5 years | 5–10 years |
| Cold Performance | Poor | Good | Poor (until warm) |
| Vibration Resistance | Low | High | Very High |
| Self-Discharge | High | Low | Very Low |
| Best For | Budget builds, older bikes | Most modern bikes | Performance bikes, weight-sensitive riders |
The Real Talk
Flooded Lead-Acid: The old-school option. Still sold, still works, but requires checking electrolyte levels periodically and keeping it upright. On a modern bike, there’s little reason to choose this unless budget is the absolute only consideration.
AGM (Absorbed Glass Mat): This is the sweet spot for most riders. The electrolyte is absorbed into fiberglass mat separators, making it sealed, spill-proof, and vibration-resistant. It handles the heat and vibration of everyday riding far better than flooded batteries. This is the go-to recommendation for most street bikes and cruisers.
Lithium-Ion (LiFePO4): The high-tech option. Dramatically lighter, longer-lasting, and with an extremely low self-discharge rate (great for bikes that sit for months). The catch? Cold weather is their nemesis. Below about 40°F (5°C), lithium batteries need a warm-up period before they’ll crank properly. Some modern lithium batteries have built-in battery management systems (BMS) that help with this. Also, not all bike charging systems are fully compatible—check before buying.
Best lithium-ion motorcycle battery 2026: The Antigravity ATX-20 and Shorai LFX series continue to lead the market for premium lithium options, offering built-in BMS, exceptional cold-start performance improvements over earlier generations, and industry-leading warranties. For AGM, the Yuasa YTX series remains the gold standard.
Cold Cranking Amps (CCA): Why It Actually Matters
CCA stands for Cold Cranking Amps—the number of amps a battery can deliver at 0°F (-18°C) for 30 seconds while maintaining at least 7.2 volts. It’s the best single number for measuring a battery’s starting muscle.
Why does this matter in practice?
- A 250cc commuter might need only 100–150 CCA to start reliably. The engine is small, compression is low, and it doesn’t take much to spin it over.
- A 1200cc Harley-Davidson V-Twin or a big adventure bike might need 280–330+ CCA. More cylinders, higher compression, and often a longer crankshaft require a serious punch of current.
- A high-compression sport bike engine, especially one running in cold weather, can demand everything a battery has.
The rule: Never install a battery with lower CCA than your bike’s minimum spec. You can go slightly higher without issue—more CCA just means a more robust start. But going lower means sluggish starting, shortened battery life (from the strain), and eventually, no start at all.
Common Beginner Mistakes (Painful, But Educational)
Look, we’ve all been there. Here are the classics:
1. The Terminal Nut Drop
You’re loosening the terminal bolt, and ping—the little nut bounces off the frame and disappears into the void. It’s now somewhere in the deepest recess of your motorcycle’s soul. Always work over a tray or rag, and keep a few spare M6 nuts in your toolkit.
2. Connecting Positive Before Negative (When Removing)
This causes a short circuit if your wrench touches the frame while still on the positive terminal. Always negative first when disconnecting.
3. Buying the Wrong Battery
“It’ll fit” is not the same as “it’s the correct spec.” Wrong CCA, wrong group size, wrong terminal position—it matters. Buy by spec, not by shape.
4. Forgetting to Re-initialize the ECU
Modern bikes with fuel injection may need to re-learn idle speed and throttle position after battery replacement. If your bike idles rough for the first few minutes after a new battery, give it 10–15 minutes of running time. Some bikes have a specific re-initialization procedure in the manual.
5. Over-tightening the Terminal Bolts
Lead battery posts are soft. Overtighten and you’ll crack the post right off the battery. Firm is fine. Torque spec is typically around 3–4 Nm—not much.
6. Skipping the Charging Step
Many replacement batteries, especially AGM, ship partially discharged. Before installing, charge the new battery fully with a proper motorcycle battery charger. Starting on a half-charged battery immediately puts unnecessary stress on it.
7. Ignoring the Root Cause
If your battery died because of a parasitic draw (something draining it when the bike is off) or a failing alternator, a new battery is just a temporary fix. Test your charging system every time you do a motorcycle battery replacement.
Keeping Your Battery Alive: Tenders & Trickle Chargers
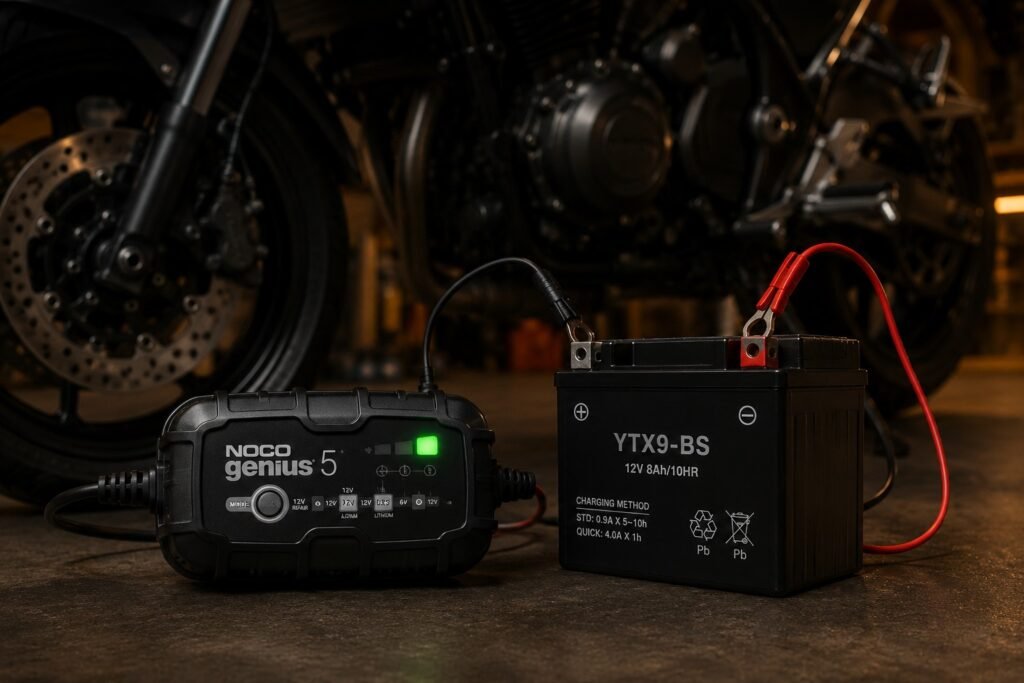
The number one killer of motorcycle batteries isn’t the starter motor. It’s sitting unused.
When a battery discharges slowly over weeks or months, lead sulfate crystals form on the plates—a process called sulfation. Once this happens badly enough, the battery can no longer accept a full charge. It’s permanently damaged.
Battery Tender vs. Trickle Charger: What’s the Difference?
| Trickle Charger | Smart Battery Tender | |
|---|---|---|
| How it works | Delivers a constant low current | Monitors voltage and charges only when needed |
| Safe to leave connected? | No — can overcharge | Yes — fully automatic |
| Best use | Short-term charging sessions | Long-term storage (weeks/months) |
| Price | $10–$30 | $25–$80 |
Our recommendation: Get a Battery Tender Plus or a NOCO Genius 1 smart charger. Connect it anytime your bike will sit for more than two weeks. Most come with a quick-disconnect pigtail you can leave permanently attached to your battery so plugging in takes five seconds.
Winter storage tip: If you’re in a cold climate and the bike won’t move for 4–5 months, store the battery indoors (a basement or heated garage) and keep it on a smart tender. You’ll start spring with a battery that feels brand new.
FAQ: 8 Questions Every New Rider Asks
1. Can I jump-start my motorcycle with a car?
Technically yes, but with serious caution. Never jump-start a motorcycle with the car running. A car’s alternator outputs far more current than a motorcycle battery can handle and can fry your electronics instantly. Connect the jumper cables, leave the car off, and use just its battery to boost yours. A dedicated motorcycle jump-starter pack (like the NOCO Boost Sport) is a much better and safer solution.
2. How long should a new motorcycle battery last?
Under normal conditions: 2–5 years for AGM/Lead-Acid, and 5–10 years for quality Lithium-Ion. Lifespan is heavily affected by riding frequency, climate, charging habits, and vibration levels. A battery that regularly deep-discharges or sits dead for months will die years early.
3. Why does my battery die in the winter?
Two reasons: First, cold temperatures reduce a battery’s ability to deliver amps—chemical reactions inside the battery slow dramatically below freezing. Second, bikes sit unused for months, and self-discharge slowly drains the battery. The solution is a smart battery tender and, if possible, indoor storage.
4. How do I know what battery fits my motorcycle?
Check your owner’s manual under “specifications” or “maintenance.” It’ll list the battery group size (e.g., YTX14-BS, YTZ10S) and minimum CCA. You can also use any battery retailer’s fitment guide—enter your year/make/model and it’ll show compatible options.
5. Do I need to charge a new battery before installing it?
Yes, ideally. Most replacement batteries arrive at 70–80% charge. Installing and immediately using a partially charged battery isn’t catastrophic, but charging it fully first extends its life. Takes about 4–8 hours on a proper charger.
6. Is it normal for a new battery to die quickly after replacement?
If a brand-new battery dies within days or weeks, the battery itself is rarely the culprit. Suspect: a parasitic drain (something drawing power when the bike is off—check aftermarket accessories, alarms, and USB chargers), a failing stator/alternator not charging the battery, or a bad ground connection causing incomplete charging.
7. Can I use a car battery on my motorcycle?
No. Car batteries are physically too large, far too heavy, and designed for different discharge characteristics. A car battery delivers sustained current over time; a motorcycle battery is optimized for short, sharp bursts. They’re not interchangeable.
8. My bike has a lithium battery—can I use a regular charger on it?
Only if the charger is lithium-compatible. Standard lead-acid chargers use a charging profile that can damage or even permanently ruin lithium batteries. Look for a charger with an explicit “Lithium” or “LiFePO4” mode. Many modern smart chargers (like the NOCO Genius series) have this built in.
Final Word: You’ve Got This
Motorcycle battery replacement is one of those skills that pays for itself the first time you do it. You’ll save the diagnostic fee, the dealer markup on the part, and—most importantly—that long, defeated walk home from a dead bike.
The process we’ve covered in this step-by-step motorcycle battery installation guide works across virtually every street motorcycle, cruiser, adventure bike, and sportbike out there. The tools are cheap, the process is logical, and the satisfaction of solving your own mechanical problem? Priceless.
Keep that multimeter handy. Keep a smart tender in your garage. And the next perfect Sunday? You’ll be ready.
Ride safe. Ride smart. — MotoGearsPro
© 2026 MotoGearsPro. All rights reserved. This guide is for informational purposes. Always consult your owner’s manual and follow local safety regulations.