
Last Updated: 2026 by Chris Mchenga
You’re cruising down the highway when your instrument cluster starts flickering. Your headlight dims. A few miles later, the bike sputters and dies on the side of the road — battery completely flat. Sound familiar?
If your motorcycle is not charging while riding, you’re not alone. This is one of the most common — and most misdiagnosed — problems riders face. Most people blame the battery and buy a new one. Two weeks later, same problem. The real culprit almost always lives somewhere else in the charging system, and once you understand how it works, you can diagnose it in under an hour with a basic multimeter.
This guide is your complete motorcycle charging system troubleshooting guide — written the way a seasoned mechanic would explain it to a friend in a garage, not how a textbook would explain it. We’ll cover everything from the three core components of your charging system, to voltage testing, stator checks, rectifier diagnosis, and those sneaky “silent killers” that drain batteries overnight.
Let’s get your bike charging properly again.

The 3 Pillars of Your Motorcycle’s Charging System
Before you touch a single wire, you need to understand what you’re working with. Your motorcycle’s charging system has three major components, and a failure in any one of them can leave you stranded. Think of them as a relay race — each one passes power to the next, and if any runner drops the baton, the race is lost.
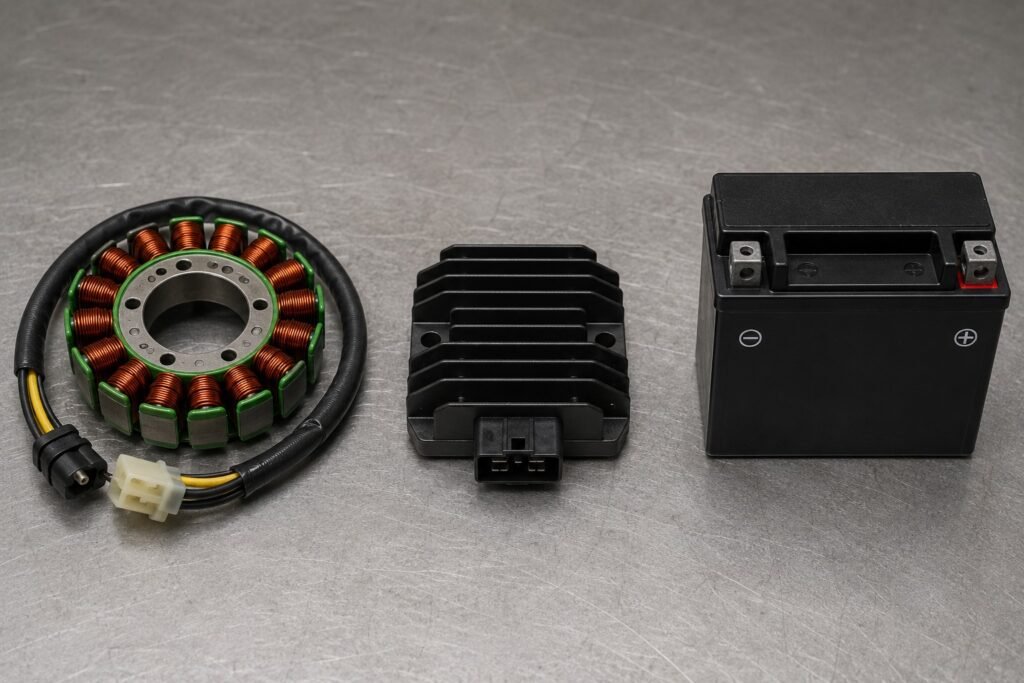
1. The Stator
The stator is essentially a generator bolted to the inside of your engine’s crankcase cover. As your engine spins, magnets (mounted on the rotor) rotate around the stator’s copper coils, generating alternating current (AC). This is raw, unregulated electrical energy — it fluctuates wildly with engine RPM and is no good for charging a battery on its own.
Most modern motorcycle stators are three-phase units, meaning they have three sets of windings that produce three separate AC outputs. You’ll see three wires coming from the stator to the regulator rectifier, often yellow or white in color.
Key fact: Stators are often killed by heat. If you ride in extreme temperatures — like the punishing summer heat in Dubai, where ambient temperatures regularly exceed 45°C — your stator works harder and runs hotter, dramatically shortening its lifespan. The same goes for dusty environments where clogged cooling passages accelerate thermal breakdown.
2. The Regulator Rectifier
This little black box is the most commonly failed component in the entire charging system, and it does two jobs in one:
- Rectifying: It converts the AC power from your stator into DC power that your battery and electronics can use.
- Regulating: It caps the voltage output so it doesn’t exceed roughly 14.5 volts, which would fry your battery and electronics.
When a regulator rectifier fails — and they fail often — your battery either stops receiving charge entirely, or it gets overcharged until it boils dry. Neither outcome is good. The reg/rec is particularly vulnerable to heat, which is why you’ll often find them mounted in an airflow path on the bike. When that airflow is blocked, or when the unit is improperly grounded, it cooks itself.
3. The Battery
The battery is both a power source and a buffer. When the engine is off, it powers your starter and accessories. When the engine is running, it absorbs excess voltage from the charging system and smooths out electrical spikes. A healthy battery should hold a resting voltage of about 12.6–12.8 volts and accept a charge from the charging system of 13.5–14.8 volts at idle or higher RPM.
Here’s what most riders don’t realize: a battery can appear healthy (it starts the bike fine) but still fail under load or refuse to hold a charge when the charging system is weak. This is why you must test the battery under load, not just at rest.
Warning Signs: Symptoms of a Failing Charging System
Your bike will almost always warn you before it leaves you stranded. Here are the telltale signs that something is wrong, and what they might point to:
Headlights get dim at idle, brighter when you rev the engine
This is a very common charging system problem. When the bike is idling, the stator produces less power, so the headlights may look dim. When you rev the engine, the stator makes more power and the lights become brighter again. This usually means the stator is weak or starting to fail. Sometimes it can also be caused by a bad ground connection.
Motorcycle battery keeps dying while riding
If the bike slowly loses power while you ride — the dashboard flickers, fuel injection acts strange, or the engine shuts off — the battery is not charging properly. This is one of the clearest signs of a bad stator or a failed regulator rectifier.
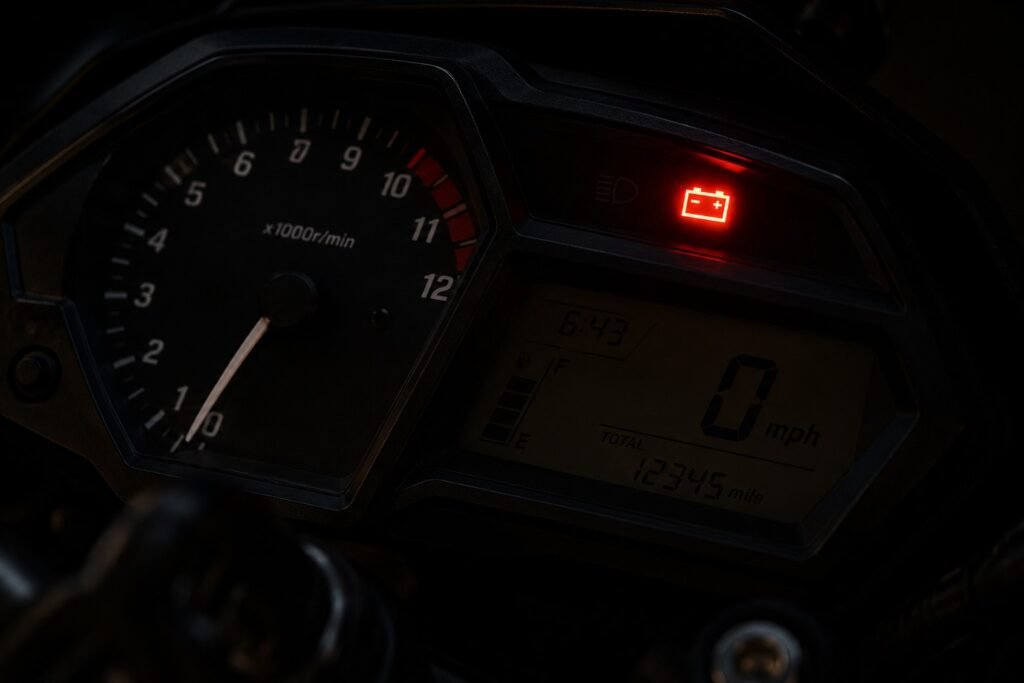
Battery warning light comes on
Some motorcycles have a red battery warning light on the dashboard. If it turns on while riding, the charging system voltage has dropped too low. This usually means there is a problem with the alternator system, such as the stator or regulator rectifier failing.
Bike struggles to start after a short ride
If the motorcycle starts normally in the morning but struggles to crank after riding for 20 minutes, the charging system is not keeping the battery charged. Instead of recharging the battery while you ride, the bike is slowly draining it.
Burning smell near the regulator rectifier
A burning plastic smell coming from the regulator rectifier area is a serious warning sign. The regulator rectifier may be overheating and failing. Stop riding, let the bike cool down, and check the charging voltage before continuing.
Swollen or leaking battery
A battery that looks swollen or is leaking acid may be getting overcharged. This often happens when the regulator rectifier fails and sends too much voltage to the battery. An overcharged battery can become dangerous and should be replaced immediately.
Step 1: The Battery Load Test — Is the Battery Actually the Problem?
Before taking apart your stator or buying a new regulator rectifier, first make sure the battery itself is healthy. A bad battery can look like a charging system problem and lead you in the wrong direction.
What you need
You’ll need a digital multimeter. Even a basic one in the $20–$40 range works fine for this test.
Resting battery voltage test
Turn the motorcycle completely off and let the battery sit for at least two hours. This gives you a more accurate reading.
Then:
- Connect the red multimeter probe to the positive (+) battery terminal
- Connect the black probe to the negative (-) terminal
- Set the multimeter to DC voltage mode
This test will show you how much voltage the battery is holding while at rest.
| Resting Voltage | Battery State |
|---|---|
| 12.7V – 12.8V | Fully charged ✅ |
| 12.4V – 12.6V | Partially charged — okay |
| 12.0V – 12.3V | Low — needs charging |
| Below 12.0V | Critically low or bad battery ❌ |
| Below 11.8V | Dead cell — replace battery ❌ |
Load test (the most important test)
Start the motorcycle and turn on the headlight to place some demand on the electrical system.
Now check the battery voltage while the engine is idling. The voltage should go up slightly compared to the resting battery voltage. If the voltage drops instead, the charging system is not producing enough power to keep up.
Charging voltage test at higher RPM
Next, gently rev the engine and hold it at around 3,000–4,000 RPM.
While holding the RPM steady, measure the voltage directly at the battery terminals with your multimeter. This test shows whether the charging system is working properly when the engine speed increases.
| Voltage at 3,000–4,000 RPM | Verdict |
|---|---|
| 13.5V – 14.8V | Charging system is healthy ✅ |
| 13.0V – 13.4V | Marginal — investigate further |
| Below 13.0V | Charging system is failing ❌ |
| Above 15.0V | Regulator is failed — overcharging ❌ |
If you’re seeing healthy voltage here, the charging system is doing its job and the problem may be a parasitic drain or simply a tired battery. If voltage is low or not rising with RPM, move to Step 2.
Step 2: How to Test the Stator Output — AC Voltage Guide
If the battery test shows there may be a charging problem, the next step is to test the stator. This checks whether the stator is producing power correctly.
The good news is you only need a digital multimeter set to AC voltage (ACV).
Find the stator connector
Look for the connector coming out of the engine case and going to the regulator rectifier. Most motorcycles use a connector with either 2 or 3 wires, usually yellow or white. Disconnect this connector before testing.
Testing a 3-phase stator
Start the engine and hold it at about 3,000 RPM.
Set your multimeter to AC voltage mode. Then test the voltage between each pair of stator wires.
On a 3-wire stator, you will test these three combinations:
- Wire 1 to Wire 2
- Wire 2 to Wire 3
- Wire 1 to Wire 3
This test shows whether all parts of the stator are producing equal power.

| AC Output at 3,000 RPM | Result |
|---|---|
| 20V–70V+ AC (varies by bike) | Stator is producing power ✅ |
| Low output (under 15V AC) | Weak or failing stator ❌ |
| 0V on one pair | Open coil — stator needs replacement ❌ |
| Uneven readings across pairs | Partially grounded coil ❌ |
Checking for a shorted stator coil
Now you need to check if any of the stator coils are shorted to ground.
Set your multimeter to resistance mode (Ohms).
Then:
- Connect one probe to a stator wire
- Connect the other probe to the engine case or any clean bare metal surface on the engine
Do this for all the stator wires one at a time.
You should see “OL” or infinite resistance on the multimeter. That means the stator wires are properly isolated from ground.
If the meter shows continuity or any resistance reading, one of the stator coils is shorted to ground. That means the stator is faulty and should be replaced.
Important tip
Stator readings can change slightly depending on temperature. If the bike has been sitting in very hot sun or the engine is extremely hot, the results may not be fully accurate.
For the best results, test the stator when the engine is warm, but not extremely hot.
Step 3: Troubleshooting the Regulator Rectifier — The Most Common Failure
Here’s the reality: in our experience at MotoGearsPro, the regulator rectifier fails far more often than the stator. It’s a semiconductor device, it generates heat, and it doesn’t cope well with poor grounding or high ambient temperatures. If you ride a sportbike — an older CBR, R6, GSXR, or similar — and your motorcycle is not charging while riding, check the reg/rec first.
Signs of Overheating on Your Regulator Rectifier
- The unit is too hot to touch briefly after a ride (a warm reg/rec is normal; a scorching one is not)
- Melted or discolored connector plugs
- Visible burn marks on the housing
- The wiring harness side of the connector smells of burned plastic
The Rectifier Diode Test
Set your multimeter to the diode test function (the symbol looks like an arrow pointing to a vertical line). A rectifier contains a series of diodes that only allow current to flow one way — they convert AC to DC. If any diode has failed shorted or open, the whole unit is compromised.
With the reg/rec disconnected from the bike, probe each of the AC input wires (from the stator side) to the DC output terminals (battery positive and negative) in both directions.
- In one direction, you should see a forward voltage reading (typically 0.4–0.7V for silicon diodes)
- In the reverse direction, you should read OL (open — no current flow)
If you see OL in both directions, the diode is open (failed). If you see a low reading in both directions, the diode is shorted. Either failure means the regulator rectifier must be replaced.
The Ground Connection Check
This one is massively overlooked. A bad ground on the reg/rec causes it to run hot and fail prematurely. Find where your reg/rec grounds to the frame, clean the contact surface down to bare metal with sandpaper, and apply a small dab of dielectric grease before reinstalling. This five-minute job has saved many bikes from a $150 regulator replacement.
Recommended replacements: For those who want quality, brands like Rick’s Motorsport Electrics, Shindengen (OEM supplier for many Japanese bikes), and Electrex World produce reliable aftermarket units. Avoid the ultra-cheap eBay units — they often fail within months.
The “Silent Killers”: Corroded Terminals and Parasitic Drains
You can have a perfect stator and a brand-new regulator rectifier, but if your battery terminals are corroded or you have a parasitic drain, your motorcycle is not charging while riding effectively — or at all.
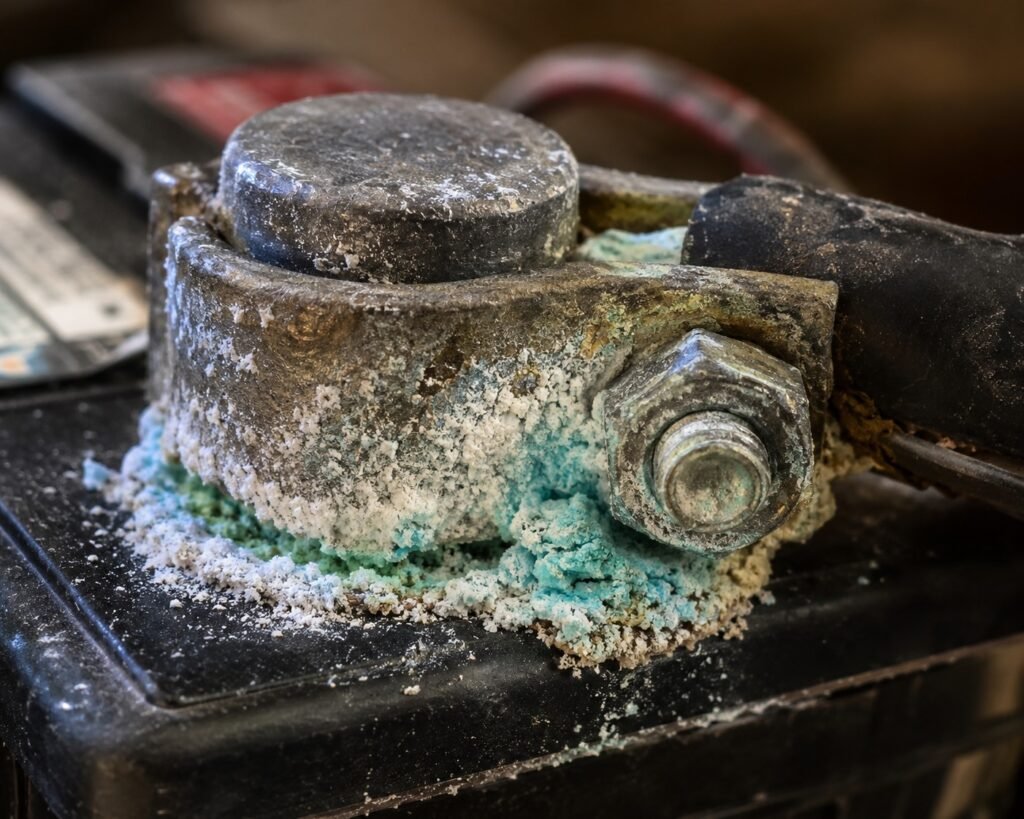
Motorcycle Battery Terminal Corrosion: Cleaning and Prevention
Corrosion is that white, blue, or green powdery buildup on your battery terminals. It’s caused by hydrogen gas venting from the battery reacting with the metal terminals. Corrosion adds electrical resistance right at the source — it’s like trying to fill a bucket with a sock stuffed in the spout.
How to clean corroded terminals:
- Disconnect the negative terminal first, always.
- Mix one tablespoon of baking soda with a cup of warm water.
- Apply it to the terminals with an old toothbrush and let it fizz — it’s neutralizing the acid.
- Rinse, dry, and use a terminal brush or fine sandpaper to polish the terminal and cable ends to bare, shiny metal.
- Reconnect and apply a thin coat of dielectric grease or a dedicated battery terminal protector spray.
In hot, humid climates — or even in desert conditions like those in the UAE — terminals corrode faster than you’d expect. Make it a habit to inspect them every couple of months.
Finding a Parasitic Drain
A parasitic drain is current being drawn from the battery when the bike is switched off — perhaps from an aftermarket alarm, a badly wired accessory, or a stuck relay. Even a 20–30 milliamp drain will flatten a motorcycle battery within a week.
To test for a parasitic drain:
- Turn the bike off and remove the key. Allow all systems to go to sleep (2–5 minutes).
- Set your multimeter to DC amps (start with the highest range — 10A).
- Disconnect the negative battery cable and connect your meter between the cable end and the battery negative post. You’re now the connection.
- Any current reading above 5–10 milliamps (0.005–0.010A) indicates a drain.
To find the source, pull fuses one at a time while watching the meter. When the reading drops to near zero, you’ve found the circuit with the drain.
Budget Motorcycle Charging System Repair Tips
Not everyone has $200 to throw at the problem blindly. Here are some smart, budget-conscious strategies:
Test before you buy. Every single step in this guide requires nothing more than a $20–$40 digital multimeter. Don’t replace parts based on guessing — it’s expensive and often wrong.
Check connections and grounds first. A huge percentage of charging issues are caused by loose connectors, corroded terminals, or poor ground connections. These cost nothing to fix.
Source quality parts. A cheap regulator rectifier from an unknown seller might cost $25, but when it fails again in three months (and it often does), you’ve wasted $25 and your time. A quality unit from Rick’s Motorsport Electrics or an OEM-equivalent might cost $80–$120 but lasts years.
Rebuild your stator connector. The plastic connector between the stator and reg/rec is often the first thing to fail — not the stator itself. Replacement pigtail connectors are available online for a few dollars and can save a perfectly good stator from the recycling bin.
Use a battery tender. If your bike sits for more than a week at a time, a quality battery tender/maintainer (not a trickle charger — there’s a difference) will extend battery life significantly. A good NOCO or Optimate tender costs $40–$80 and pays for itself in saved batteries.
A Quick Diagnostic Cheat Sheet
Use this when you’re standing in the garage with your multimeter, ready to work:
| Symptom | First Check | Second Check |
|---|---|---|
| Lights dim at idle | Battery voltage at idle | Stator AC output |
| Battery dead after riding | Charging voltage at 3K RPM | Reg/rec diode test |
| Battery swollen/overcharging | Charging voltage at 3K RPM | Replace reg/rec |
| Bike dies while riding | Battery load test | Stator AC output + grounds |
| Intermittent charging | Stator connector/ground | Parasitic drain test |
| Battery flat after 1 week sitting | Parasitic drain test | Battery condition |
Final Thoughts: Don’t Guess, Test
A motorcycle not charging while riding is a frustrating problem, but it’s completely diagnosable with patience and a basic multimeter. The three-component system — stator, regulator rectifier, battery — is logical and sequential. Test them in order, starting with the battery, then the stator, then the rectifier, and check your grounds and connections throughout.
Most importantly, don’t fall into the trap of replacing one part after another based on guesses. Every diagnosis in this motorcycle charging system troubleshooting guide is rooted in actual electrical measurements, not assumptions. That saves you money, saves you time, and gets you back on the road with confidence.
If you found this guide useful, bookmark it for your next roadside head-scratch — and share it with a fellow rider who’s been chasing a charging gremlin. We’ve all been there.
Have a question about your specific bike or charging system reading? Drop it in the comments below — our team at MotoGearsPro reviews them all.